+44(0) 1234 567 890 info@domainname.com

Monday 28 November 2011

Surface Computers From Microsoft


The Microsoft Surface® platform brings people together to connect.  It enables experiences that change the way people collaborate and connect with a 360-degree interface. And, with PixelSense. Microsoft Surface sees and responds to touch and real world objects—supporting more than 50 simultaneous inputs.

How can you use the Surface platform in your organization? The only limit is your imagination. Whether you're in hospitality, retail, healthcare, professional services, or the public sector, you can change the way people interact with information and with each other.
  • Make content more engaging.
  • Plan and simulate. 
  • Make learning more fun.
  • Transform the shopping experience. .
  • Connect with customers through games and pastimes. 
  • Communicate and connect. 


No comments

Wednesday 23 November 2011

Common Problems in Windows


Learn about some free software utilities that will help you fix the most common Windows problems. They are all compatible with Windows XP, Vista and Windows 7.

Fix Windows Problems with Free Tools
Q1. I am trying to delete a file from my desktop but
the computer won’t let me do that. Instead, it throws me an error message saying that the file /folder is in use by another program or user.
A: You can either reboot your computer in Safe mode to delete that file or, if you want something more simple, get Unlocker. It’s a free utility that will let you close all the processes that have possibly locked the file and once they are closed, you can then safely delete the file.
Q2. I am trying to play a video file on my computer but the media player says that I am missing certain codecs.
A: You can use a tool like Video Inspector to determine which audio and video codecs are required to play the video file on your computer. Alternatively, you can download a codec package like the K-Lite Pack (Click for Free download) that will let you play virtually any audio and video format on your computer.
Q3. I am running out of disk space on my Windows computer. How can I remove all the unnecessary files from the computer and recover some disk space?
A: There are three things you can do here:
  • Open the Run box and type “cleanmgr” to open the built-in Disk Cleanup utility. It will remove all the temp files and the unnecessary system files that you no longer need.
  • Use WinDirStat to determine where all your disk space has gone. Sometimes files are hidden in sub-directories that you can safely move to other drives or even delete them permanently.
  • Use Duplicate Cleaner to identify and delete all the duplicate files on your hard drives. You can move the duplicates to the recycle bin or, if you want to play safe, to any another folder from where they can be easily recovered.
Q4. My computer takes lot of time to boot-up. I checked the “start-up” folder in the Windows start menu and there aren’t any applications out there.
A:  Type “msconfig” in the Run box to open the “System Configuration” tool and then switch to the “Start-up” tab. Disable all the programs that you don’t need to run during start-up. If you are a power user, you may also switch to the “Services” tab and disable all the unnecessary services.
Autoruns is another excellent utility that shows you what programs are configured to run during system bootup or login.
Q5. I am trying to uninstall a program from my computer but the standard add-remove programs is not letting me through.
A: You can use the free Revo Uninstaller utility to remove every single trace of any program from your computer. Revo can also remove entries from the Windows Registry that may have been left by previous un-installation routines.
Q6. My Windows crashed with a “Blue Screen.” Why?
A: You really need to get in touch with a geek to debug the cryptic Blue Screen errors (aka “Blue Screen of Death”) but if you are lucky, a free utility called BlueScreenView can provide vital clues. Blue Screen View will scan the Windows dump files to determine the device drivers that possibly caused the crash.
Q7. It takes ages to copy files in Windows from one folder to another. The situation is marginally better in Windows 7 (over Vista) but still, is there a way to copy files faster?
A: You can use an external file copying utility like TeraCopy – this is not only copy /move files across drives faster but you can also resume broken file transfers (similiar to FTP operations).
Q8. I think I deleted a file by mistake. Can I recover it?
A: Recuva is a free software that will scan your hard drives, USB stick and other external drives for any deleted files that it can possibly recover. It may not work in all cases especially when you securely deleted a file.
Q9. Every time I copy something new to the Windows clipboard, the previous content gets erased. Can I make it permanent?
A: You can use Ditto, a free utility that sort-of adds memory to your Windows Clipboard. You can copy anything to the clipboard and it will stay there as long as you want.
Q10. How do I protect files and folders on my computer?
A: While there are free tools like Hide Folder that let you easily protect files and folders with a password, use TrueCrypt if you want a more secure solution. The obvious downside with a program like TrueCrypt is that if you forget the password, it is nearly impossible to retrieve the protected files.

No comments

Tuesday 22 November 2011

What is Cloud Computing


Cloud computing is known as Internet based computing, with shared resources, software and information are provided to computers and other devices based on requirement.  Cloud Computing is a Computing in which services and softwares are provided over the Internet (or “cloud”). Cloud Computing is a technology used to access services offered on the Internet cloud.
Normally cloud computing is a good way to run your business. Instead of running your softwares yourself in your server, Applications run on a shared data center. When you use any application that runs in the cloud, you just log in, change settings, and start using it. Cloud computing is a simple concept , software and services are delivered over the web and through a browser, with no server or client software to install. Cloud computing tools are available any time, anywhere, from any device connecting to the Internet.

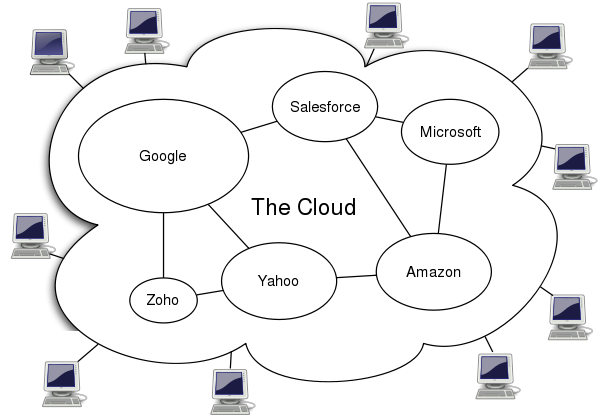
The basic concept of cloud computing is using software via the Internet instead of installing it onto your computer. You use an online company to retrieve a particular program. The abstract image of the cloud refers to the Internet. From this cloud, you can find programs that you want to utilize. Through web browser you can access programs from cloud.
605px Cloud computing.svg  What Is Cloud Computing ?
There  two main part of cloud computing are the front and back ends. The front end is what the user sees. This involves the network and applications being used. The back end involves the computers, data storage devices, and servers that compose the cloud. Every web application that you’ve ever used, like Gmail, Google Calendar, Hotmail, SalesForce, Dropbox, and Google Docs, are based on “cloud computing”, because when you connect to one of these services, you’re really connecting to a group of servers somewhere out there on the internet.

Cloud Computing Is Dangerous ?


Main fact that cloud computing services are shared all over the world and could be shut down at any time.If any problem in cloud computing server it will affect complete clients connected to that server. The basic fact that you are sharing data with world in big security risk. Example, If I have my server with my data than at least I know that I can protect my data, but if I mix my data with hundreds of servers storing others data as well and if there might be one hole in any application, that will allow a virus to move to the others and it affecting my data. Facebook , Google and other cloud Computing service companies now using more security options for protect user data from external application access.
I hope it is useful for all users. Share your comments about it in the comments box below

No comments

Saturday 19 November 2011

How To Fix "Task Manger Has Been Disabled"

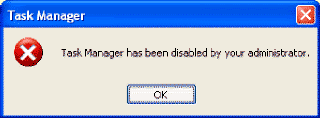
In such case when you try to open the Task manager by pressing “Alt + Ctrl + Del”, a message appears like “Task Manger has been disabled by your administrator”.
Facing this problem lot of time in past
At first you need to know which process are causing the problems. You can identify it from the Task Manager. But the virus programmers are much aware about this system and they make their program such that it disables the Task Manager from the registry.


 So your first object is to enable your Task manager to identify the harmful services that are running in your computer. Next you can kill the processes to stop running. Here I have described some easy and simple way to re-enable The Task Manager.
A. The procedures to re-enable the Task Manager with out using any soft pack

1. Re-enable the task manager from Registry

The Task Manager can be enabled by modifying the registry entry. In some case the registry access is also blocked by the virus. Then you must get first the access of registry to modify it. You can enable the access to the registry using the Disk Heal (Some Screenshots)utility, which have mentioned later in this article. However if you have the access to registry then follow the steps below:
  • Press “Windows Key + R“, type “regedit” in the “Run” dialogue box.
  • Navigate to
HKEY_CURRENT_USER\Software\Microsoft\Windows\Current Version\Policies\System
  • Double click on “Disable TaskMgr” at the right pane.
  • Set the value to 0.
  • Restart the computer.

2. Re-enable the Task Manager through Run Command

You can also re-enable the task manager from the Run command.
  • Press “Windows Key + R“.
  • copy the code below and paste it in the “Run” dialogue box.
REG add HKCU\Software\Microsoft\Windows\CurrentVersion\Policies\System
/v DisableTaskMgr /t REG_DWORD /d /0 /f
  • Hit “Enter“.
  • Restart your computer.

3. You can also make a registry file to enable the Task Manager

If you do not want to edit registry manually then you can make a registry file to enable the Task Manger.
  • Open Notepad.
  • Copy the following codes exactly as it is in the following:
Windows Registry Editor Version 5.00
[HKEY_CURRENT_USER\Software\Microsoft\Windows\
CurrentVersion\Policies\System]
“DisableTaskMgr” =dword:00000000
  • Save the file name as “taskmgr.reg
Now double click on the registry file that you have created and restart your computer.

4. Re-enable the Task Manager through the Group Policy

  • Press “Windows Key + R“, type “gpedit.msc” in the “Run” dialogue box.
  • Navigate to User Configuration>Administrative Templates\System\Ctrl+Alt+Del Options.

  • Double click on the “Remove Task Manager” and set it to “Disabled” or “Not configured”.
B: Re-enable the Task Manager using some application tools

1. Re-enable the task Manager by Disk Heal

Disk Heal is small but useful software. Using the disk heal you can fix many problems of your computer. To re-enable the task manager click on the “Fix” tab and then the “Fix” button at the right side of the “Fix task manager inaccessibility”.

Download Disk Heal

2. Download Task Manager Fix to re-enable the Task Manager

Download Task Manager Fix. After downloading, just run the application to re-enable the Task Manager. this application does not require any installation. just click on the “Fix Task Manager” button to re-enable the Task Manager.

3. Download VB script file to re-enable the task Manager

  • Download the VB script file from Paulxp and run it.
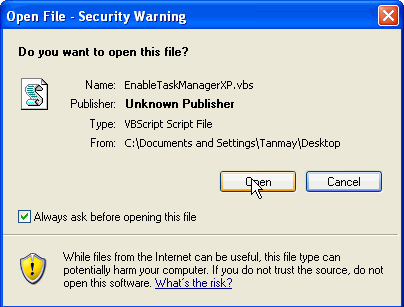
  • You will get a security warning message. But don’t worry, click “Open” to proceed.

  • Now a confirmation message will appear. Click on “Yes”.

You can use any of the above processes. Feel free to comment if you know any other method.
No comments

Friday 18 November 2011

Windows XP- System File Checker


Windows XP has the ability to protect itself from system instability caused by 3rd party software overwriting important system files.


In Windows XP we have more refined protection of these important files.

Windows File Protection
By default, Windows File Protection is always enabled and allows Windows digitally signed files to replace existing files safely. Currently, signed files are distributed through:

1. Windows Service Packs
2. Hotfix distributions
3. Operating system upgrades
4. Windows Update
5. Windows Device Manager

The main reason for using this utility is when you suspect there may be a problem with a Windows XP system file.

Perhaps you get a dialog box appear informing you of a problem with a .dll file, or your program will just not load! It is therefore worth checking to see if there are any corrupt system files using sfc scannow.

To do this simply go to the Run box on the Start Menu and type in:
sfc /scannow

This command will immediately initiate the Windows File Protection service to scan all protected files and verify their integrity, replacing any files which has a problem.

The following should appear to give an indication of how long the process is taking.


Any corrupt, missing or incorrect files would be replaced by this process. The most common issue with scannow sfc is the following dialog box appearing:


When does this happen?

In the computer's operating system registry, are several settings that are checked when you run scannow sfc.
The Windows File Protection service constantly monitors for any changes to the main system files.

Well Windows XP keeps a cache (copy) of these essential files at the following location:
C:WINDOWS\System32\Dllcache (assuming C: is your system root)

The dllcache folder is extremely important so Windows XP hides it from you! To view it go to:
My Computer--> Tools--> Folder Options--> View--> "uncheck" Hide protected operating system files.

If that's the case on your computer then there is normally no need for the original XP CD to be inserted as your computer has a "copy" it can get hold of in this cache.

But, if the Dllcache folder, or part of it, has become corrupted for some reason then you will be prompted for the XP CD - so your computer can get a clean copy.
No comments

Monday 14 November 2011

How To Protect Partitions - Using Deep Freeze

In computer maintenance solution, aside from Group Policy Editor in Windows operating system, I recommend to them to use a third party program called "Deep Freeze". Deep Freeze is made by Faronics which when installed, Freeze the current system. In other words, if your computer will be "Deep Freeze", no changes will happen on the partition it will freeze. No changes means no users could install or uninstall software, Save, Delete any files even if that files is a bootable or program files. So your computer and your files save on it are safe.

Recommended a small tool which is being used by Internet cafes and libraries, for example. With that neat little tool, there is…
  • No need to run and install the latest version of anti-virus software
  • No need to run and install the latest version of anti-spyware software
  • No need to run and install the latest version of Windows Update (some of which destroy your Windows installation; isn’t that funny?)
  • No need to run and install the latest version of firewall software
  • No need to make a new, clean OS install every 1-2 years because the computer became too slow
  • No need to worry about data loss due to hackers, trojaners, viruses, system crashes, etc etc
  • No need to worry about whether or not Windows’ System Restore works (it never worked in my case)

Here is the tutorial on how to use Deep Freeze. Let us first learn how to install it.  Follow these steps: 
HOW TO INSTALL?

1. Double click the setup icon, in the Welcome Screen, you will learn that this installer will be use to uninstall it so do not delete the installer. Just save it on your computer so in case you need to uninstall the Deep Freeze, it will be easy. 

2. Tick the I Accept option and click next.

3. Enter the License Key then click Next.

4. Select the partition you want to "Freeze". On this part, you should think what is best on your computer. Most of computer shop owners do not create other partitions on their disk drive so the whole disk will be deep freeze. This is because they don't need to save anything on each units and it will be easy for them if they freeze the whole computer so they will have less monitoring on their client moves on each unit. Also, Daily maintenance will be lessen. For those who will use Deep Freeze on their personal computers, I advise them to create another partition from their hard disk drive. Then during the installation of deep freeze, just select the system partition. Leaving the other partition. This will allow the computer user to save their important files because only the system drive is freeze. 

5. Click Install button. After the installation, your computer will restart automatically.


HOW TO USE DEEP FREEZE? 

Secure your Deep Freeze. 
After installing the Deep Freeze, you need to set a password on it so others will not be able to change any settings on it. To do this, follow these steps:

1. Access Deep Freeze. You could access it using a keyboard shortcut combination CTRL+ALT + SHIFT + F6. or by holding the CTRL+SHIFT keys and double clicking the icon of a bear in notification area.

2. Set the password by clicking Password tab.

3. Enter the password then click Apply and reboot. Take note that if you want to change any settings in Deep Freeze, you need to reboot your computer.

4. Click OK.

5. Click YES to reboot your computer.

HOW TO DISABLE DEEP FREEZE? 
If there will be time that you need to do something on your computer, installing or uninstalling a software for example, and changes should be done, you need to disable the Deep Freeze First then reboot the computer. After the reboot you should notice that the icon of Deep Freeze in your notification area should be mark with X, and usually blinking. This means it is disabled. So changes on your computer will be done.

1. To disable Deep Freeze, Click Boot Thawed option and Click Apply and Reboot.

 2. If you want to enable it, just select again Boot Frozen then click Apply and Reboot.


HOW TO UNINSTALL DEEP FREEZE? 

If you need to uninstall the Deep Freeze on your computer, the installer you used must be run again. Do not forget to disable first the Deep Freeze. After running the installer,


2. Click Next to continue.

3. Then after clicking next, you should see the uninstall button, then your computer will restart automatically. After the reboot it should be successfully removed from your computer.

To Download Deep Freeze
PDF Manual in English

1 comment